How to print large modal popup?

Hello Readers,

Today we are going to see how to print large html modal popup. This is a situation that occurred to me in one of my assignments. The regular javascript command i.e.
window.print();
fails when printing a modal popup. The thing is that it fails to figure out the actual size of the content and shows only part of the content in the print preview.
I tried number of solutions which worked but then they had serious CSS issue while printing.
However, "PrintArea" jquery plugin (https://github.com/RitsC/PrintArea/) takes care of all these issues. It is also browser compatible and has bunch of options to customize what you wish to print.
It is very simple to use as well. All you have to write is
$( divIdToprint ).printArea( options );
 So, if you are struggling with issues related to printing large modal popup then go ahead and give this plugin a try :-)
 

Setting up ImageMagick (Imagick) in XAMPP PHP

Hello There,

I recently had a requirement to use PHP ImageMagick Plugin for one of my project.
So, I created this sample project that I am sharing here for you to use in case you need help.

About the project

https://bitbucket.org/bhaskarvyas001/imagick


This Project demonstrates how can you use the ImageMagick plugin in PHP to convert images / PDF from one format to another. More details about imageMagick here --> About ImageMagick

How do I get set up?

Follow these steps to properly install and enable ImageMagick in you environment.

1. Open PHPInfo and check:
   Architecture = x86 or x64
   Thread Safety = yes or no


2. Download ImageMagick from:
   http://windows.php.net/downloads/pecl/deps/

   In my case I downloaded: ImageMagick-6.9.3-7-vc11-x86.zip
   because the Architecture under PHPInfo is x86
   as for vc11 or vc14
   search google for "visual c++ 11 runtime" or
   "visual c++ 14 runtime" and install it

3. Unzip and copy all dlls from the bin subfolder to the
Apache bin directory. It's a bunch of CORE_RL_*.dll
and IM_MOD_RL_*.dll plus a few other dlls.

In my case, I installed XAMPP in C:\XAMPP, so:
(from zip) bin/*.dll --> C:\XAMPP\apache\bin

4. Goto: http://pecl.php.net/package/imagick

    as of today, latest is 3.4.1 so I went to:
    http://pecl.php.net/package/imagick/3.4.1/windows

    My PHP version is: 5.6.18, and Thread Safety is Yes from Step #1, so I downloaded:
    5.6 Thread Safe (TS) x86
    I got: php_imagick-3.4.1-5.6-ts-vc11-x86.zip

5. Unzip and copy "php_imagick.dll" to the php extension folder:
    In my case:
    php_imagick.dll -> C:\XAMPP\php\ext

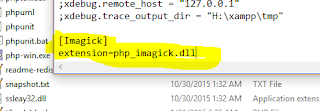
6. Edit "php.ini" and add at the very end
      [Imagick]
      extension=php_imagick.dll
   (Location of php.ini for me was C:\XAMPP\php\php.ini)


7. Restart Apache

8. Check PHPInfo
   scroll to section (or find): imagick  
   number of supported formats: 234


   If there is no "imagick" section or "supported format" is 0,
   something went wrong. Try all the steps carefully again

Text to Speech in Ionic / PhoneGap / Cordova Project

Hello Friends,

So recently I worked on this small project that is supposed to incorporate text to speech feature provided by Cordova Plugin in an Ionic project.

There are lot of plugins out there but after trying many of them; this is what worked for me.

Step 1) Install the following Cordova Plugin i.e.

cordova plugin add org.apache.cordova.plugin.tts

Step 2) Next write the following code snippet to make use of the plugin to speak the text

var textToSpeech = new SpeechSynthesisUtterance('hello There'); textToSpeech.lang = 'en-US';
textToSpeech.rate = '0.7'; speechSynthesis.speak(textToSpeech);

Write the above code snippet in the onClick function of the speak button of your application.
That's it. Enjoy the way how your application now communicates with you :-)


Thanks to the following discussion at Ionic Forum i.e.

https://forum.ionicframework.com/t/problems-with-text-to-speech/31927


Text to Speech in Ionic / PhoneGap / Cordova Project

Hello Friends,

So recently I worked on this small project that is supposed to incorporate text to speech feature provided by Cordova Plugin in an Ionic project.

There are lot of plugins out there but after trying many of them; this is what worked for me.

Step 1) Install the following Cordova Plugin i.e.

cordova plugin add org.apache.cordova.plugin.tts

Step 2) Next write the following code snippet to make use of the plugin to speak the text

var textToSpeech = new SpeechSynthesisUtterance('hello There'); textToSpeech.lang = 'en-US';
textToSpeech.rate = '0.7'; speechSynthesis.speak(textToSpeech);

Write the above code snippet in the onClick function of the speak button of your application.
That's it. Enjoy the way how your application now communicates with you :-)


Thanks to the following discussion at Ionic Forum i.e.

https://forum.ionicframework.com/t/problems-with-text-to-speech/31927


Prestashop 1.6 | Product import through CSV tips

Recently I have been uploading lots of products to the website http://www.assamesebooks.com
The upload was done through uploading a CSV file with all the product details.
The "Sample" CSV file to upload products is provide by Prestashop.

  1. To begin with navigate to the upload product CSV screen from the menu
Catalog -> Products - > click on the small import icon above the search button to navigate to the import CSV screen

Products Menu under Catalog

The import icon as highlighted

The CSV import Page

2. There are few import import settings on this page i.e.
  • Field Separator - This is the separator by how the individual columns in you CSV are separated. By default it is semicolon (;) so please be mindful of changing it if your file is a comma separated one
  • Multiple Value Separator - There are times when you have multiple values for a column. For example multiple Meta-keywords.  In that case you need to use the separator you mention here in the file.
  • Delete All products before import - I think this is self explanatory and a dangerous option. Use wisely as the products get deleted before the import starts. Which means even if there is a failure during the import; the products are already deleted.
  • Force all ID numbers - Use this option in case you want the ID in your CSV file to be used instead of auto generated by the database.
3. The sample CSV file can also be downloaded from this page. You can find it in the lower right corner side of the page. 


4. On the next page you need to MAP the columns in the CSV file to the expected values by Prestashop for product upload. This step is super important. 
Please select the data from the drop down which is represented by the CSV column.
Another important setting here is "Lines to skip". Use this option to skip the header row from your CSV file. If your CSV has no header then give this as 0 to read and process all the rows in the CSV.

You can also save your mapping by giving some name and clicking the save button. This way; next time when you plan to upload the CSV you don't have to do all the mappings.

5. Finally you are ready to start the import process. Click on the IMPORT button the the bottom of
the page.

6. Before we wrap up, I would share some tips of the way data is captured in the CSV file. Most of the columns in the CSV is self explanatory but some need special guidance. Below screen shot has those important column from my CSV file.


  • Tags - A tag is used to group related products with same search term. For EX: if we search for History then books under all categories related to History should come up who are tagged with the term History. It is a multi value column. You can give multiple values separated using the separator.
  • URL rewritten - This is supposed to be used to make SEO friendly URLs but some how populating this value in the CSV gives weird errors. So, I prefer keeping this column empty. In that case Prestashop auto generates the URL rewritten value based on the product name which as per me is a desired solution.
  • Image URLs -  This is again a multi valued column cause a product can have many images and you can give the URL of all those images separated by the separator. The funny thing is how do we get the URL of the images of a product that you are trying to upload.
    What I did is that I created a folder in the root of my server i.e. at public_html named a productImages and uploaded all the images here. Hence, the URL for the images became as "http://assamesebooks.com/productImages/AD00636.jpg". I used this URL in the CSV.
  • Feature(Name:Value:Position) - This is the most complex to understand column and the MOST important one too. This is important cause it helps us upload custom attributes of the product. For example products on http://assamesebooks.com had attributes like pages numbers, Author, Translator, year of publication etc.
    First of all we need to register our custom attributes in Prestashop. This can be done by following menu item i.e.

    Catalog - > ProductFeatures
    Post which you can mention all of these attributes / features along with their values in the same column separated by multi value separator. For example :

    Sub Title:War Book;Author:Anu Barua;Publisher:Purbanchal Prakash;Publication Year:2015;ISBN:978-81-7213-254-5;Language:Assamese;Pages:164;Weight (gms):286


    It took me nice 1 hour to figure out how to do this :-)

Hope these tips help some one save valuable time.. :-P


Fatal error: Maximum execution time of 30 seconds exceeded in PHP

The error stated in the title occurs if a database query / script is taking more than 30 seconds to execute. It is a safe guard mechanism in case you mistakenly ended up running an infinite loop.
However, many times it can be a genuine script taking m,ore time due to certain external factors.
In my case it was because of the database query with number of joins taking extra time.

The issue can be handled in 2 ways i.e.

  1. If you feel that it is just a single one off case taking more time then write the following line just before executing the script. It will increase the script execution time to 5 minute (300 seconds)

    ini_set('max_execution_time', 300); //300 seconds = 5 minutes

  2. But if you want to increase the execution time for the entire application then you will have to edit the PHP.INI file. You will have to update the below setting i.e.

    Find this line:
    max_execution_time

    Change its value to 300:
    max_execution_time = 300

Prestashop || Payment Method based on geographic location

Dear friends,

This is yet another tutorial based on my experiences using Prestashop 1.6 on my application i.e. http:/www.assamesebooks.com

Case Study
The requirement was very simple i.e. there are certain Payment Methods which we did not want to be available in certain delivery locations. For example: We do not want  user to place a Cash On Delivery (COD) order for International delivery locations.

Solution

  1. Prestashop has an inbuilt solution to tackle such problems. Please navigate to following location in Prestashop Admin i.e Modules -> Payment 


  1. On the "Payment" page; scroll to the bottom where you find the section "COUNTRY RESTRICTIONS
  2. As you can see, both the payment gateways from my website are listed here with the options to enable / disable it for a specific country.
  3. Now, you can make changes to the Payment Method based on the geography. :-)

Shipping charge based on location, country, city in Prestashop store

Hello Friends,

I come here with yet another tutorial on Prestashop base on my experiences from my website http://www.assamesebooks.com. This time it is about setting up Shipping Rates based on country / state and different combinations of it. Prestashop is a very versatile platform and it has solution for every requirement. It is just that you need to play with the system and figure out the correct way. I am saying this cause you may have to pay several dollars and buy a Prestashop module for what I am going to tell you here. so let's start..

Use Case
This requirement aroused because of the fact that we were given different Shipping rates for different  Indian States and different countries for international delivery by our shipping partner. Hence, setting up a common Shipping rule would have no way sufficed the requirement.

Solution


  1. Shipping Rule in Prestashop works based on Zones. Zones are nothing but group of Countries / states which will have common shipping rules.
  2. Hence, technically you will have to create a separate Zone for each country / state combination for which you have a different shipping rule.
  3. Zone can be accessed from Prestashop Admin panel under following menu i.e. Localization -> Zones 

  4. Creating a Zone is also very simple. So, start with creating a Zone 
  5. Next, Create a country and make sure that you add it to the zone that you create. 
  6. You can also create State and add that to the County and Zone of your liking.
  7. Once you are done creating the Zone / Country / State then you need to go to the Shipping Page in Prestashop admin panel i.e. Shipping -> Carriers
  8. Choose to create a new Carrier ans select the Zone and provide the Shipping charge for it. The Shipping charge can be either weight based or Order cost based.

  9. Repeat the step of creating Carriers for different Zones which you might have created for different States / Country. You can see in the screen shots below that  I have created a Zone named India to which I have only added the Country India. Thus I can select "India" zone and define the shipping charges which will cover my Domestic Shipping Rule requirement.
    Like wise, there are other Zones for International Locations and I have collectively made them as part of the another carrier.
  10. Domestic Shipping Rule and Carrier

    International Shipping rule and Carrier
  11. Additionally you can also restrict the users from selecting countries in Address creation wizard that are not covered by you by selecting the check box "Country Options - Restrict country selections in Front Office to those covered by active carriers"


    That's it. Now you shall be able to select the carriers only based on the delivery address County / state during checkout. And corresponding shipping charge will get applied to the order.
    See the Carrier name which is for Domestic order


    This is the carrier for Shipping International orders

Changing Email Template in Prestashop

Hello Friends,

I have been lately working on my website http://www.assamesebooks.com which is build on the wonderful open source cart Prestashop v1.6

Case Study
This post is a tutorial on how to change template of the notification emails that are sent from the application. I would be taking the New Order Notification email (new_order)  for the merchant as an example for customization. The missing thing in this notification email is that it does not contain the ORDER STATUS as part of it. Hence, in case an user tried to place an order and decides to cancel it in the payment gateway page; the order gets placed with status as "Payment Error". The notification email says that an order is placed but there is no way to know if the order was successfully placed or not.

Solution

  1. There are various variables that are used in the email template to print the order details. These variable are populated and sent from various PHP files. In this case it is done through the following file i.e. /classes/PaymentModule.php
  2. Unfortunately, this file doesnt pass the order status to the email template. However, the file does have the order status variable declared in it. So all I had to do is pass this variable as well to the list of parameters being passed to the email template. 

    You can see the $order_status variable already declared


    So, all I had to do is pass this variable to the list being sent to email template
  3. Once, this is done we need to update the email template with this variable. The email templates in Prestashop can be access from Localization -> Translations -> email templates -> email module -> new_order menu in Prestashop Admin 


  4. All you have to do is select to edit the template as HTML / Text and add following to print Order status i.e. Order Status: {order_status} order_status is the variable that I set in the PHP to pass the status value 


  5. Now when a new order alert mail comes to your mail box; you can see the order status as well in it 


    That's all... Keep coding.. :-)

MS SQL Express Server database to MySQL migration using MySQL Workbench 6.3 CE

Recently, I had to work on a migration project where the first step was to migrate the MS SQL server database to MySQL database.
As expected, I started up by searching the internet for a migration tool. I found many some free and some paid. However, the free ones were useless for the job while the paid ones were too costly to purchase a license for one time activity.

So, kept looking for a fool proof solution. Then I stumbled about a post that said that MySQL Workbench itself had a migration utility inbuilt.

So I started off with the migration progress. But I got stuck at the last step where the data had to be finally migrated from MS SQL express database to MySQL. With some more search; I came to know that it was due to a "Collation" conflict between the two. I tried changing the collation on MS SQL Express but it did not allow me to. It then when I stumbled on this simple workaround that I want to share with you guys...

The images below explains all the steps. I will feed in where required;

1. Start MySQL Workbench and select "Migration Wizard" option from the "Database" menu


2. 

3. On this step, make sure that you select Connection Method as ODBC (native)  else SQL Express database will not connect


4. 

5. 

6. 

7. 

8. 

9. 

10. 

11.  This step will create the Schema and the tables in the MySQL database. 

12. 

13.  

14. This step is important...  Select the option to "Create a batch file to copy the data at another time"


15.  

16.  

17.  This is the batch file that gets created at the location you selected.


18. When you execute the batch. It will create a folder that will have a "import_DB.cmd" batch file
You need to execute that.

19. When you execute the batch cmd in previous step; it create a folder names "DB_#####_import"


20. You need to place this folder in the MySQL database data folder. In my case since I am using MySQL through Xampp; I placed at following location i.e.

H:\xampp\mysql\data

21. After placing the folder at proper location; go to import data option in MySQL workbench


22. Select the option to "import from self-contained file" and select the "import_db.sql" file from the folder created in step 17. And click on import button to successfully import the data to the Migrated Database.


It took me two days to figure out a successful way to migrate MS SQLExpress database to MySQL. Hope this tutorial helps you get things done quicker.. :-)