I had a situation following situations thta needed to be solved
1. The strength of my primary router was not enough to reach to all parts of my house.
2. I had an old computer that needed to be connected via LAN cable.
Thus I wanted to use another router that could be kept near to the old PC. The second router would connect to the primary router via WIFI (WDS)
Here are the steps used to achieve this goal:
- Disconnect the primary router
- Conect to secondary router and Access
the Secodary router's web-based interface. usually: http://192.168.0.1
- Set
the IP address of the router:
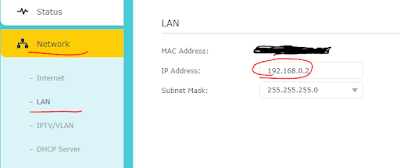
- Navigate
to Advanced > Network > LAN and adjust the extended router's IP
address to match the root router's subnet. (For instance, if the root
router's IP address is 192.168.0.1, assign the extended router an IP
address within the range of 192.168.0.2 to 192.168.0.254. For example,
192.168.0.2.)
- Save
the changes.
Note: After altering the router's IP address, log in again
to the web management page.
- Identify
the SSID for bridging:
- Visit
Advanced > System Tools > System Parameters and focus on the 2.4GHz
Wireless section. Enable WDS Bridging.
- Conduct
a survey and select the root router's SSID. (For example, TP-Link_4F98.)
- If
the root router has a wireless password, provide it.
- Save
the settings.
- Deactivate
DHCP: (Optional step. Try if it doesn't work)
- Access
Network > DHCP Server.
- Uncheck
Enable DHCP Server and save the changes.

Now, verify the WDS status by navigating to Advanced >
Status > Wireless. A "Run" status indicates successful WDS
bridging.

Now you are good to go!
Cheers 🙌
0 comments:
Post a Comment