DBeaver SSLHandshakeException certificate errors while downloading MySQL drivers

 So, on a blissful morning I had to reinstall my OS and DBeaver as well.

But to my surprise, DBeaver will not download the MYSQL driver. It kept giving some certificate error.


Network error

Network unavailable:

javax.net.ssl.SSLHandshakeException:PKIX path building failed: sun.security.provider.certpath.SunCertPathBuilderException: unable to find valid certification path to requested target

The reason being, the java certificate it uses under the hood is expired.

Simple fix to it is remove following line from "dbeaver.ini " file.
This file is present in the DBeaver install folder.
DBeaver install foder for me was "C:\Users\<user>\AppData\Local\DBeaver"

-Djavax.net.ssl.trustStoreType=WINDOWS-ROOT

Thats it. Enjoy databasing 😜

Connect your router to another router wirelessly (Wireless Distribution System (WDS))

I had a situation following situations thta needed to be solved

1. The strength of my primary router was not enough to reach to all parts of my house.

2. I had an old computer that needed to be connected via LAN cable.

Thus I wanted to use another router that could be kept near to the old PC. The second router would connect to the primary router via WIFI (WDS)

Here are the steps used to achieve this goal:


  1. Disconnect the primary router
  2. Conect to secondary router and Access the Secodary router's web-based interface. usually: http://192.168.0.1
  3. Set the IP address of the router:
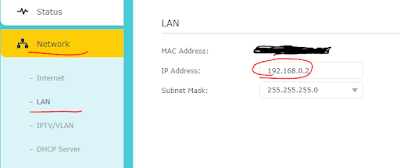
    1. Navigate to Advanced > Network > LAN and adjust the extended router's IP address to match the root router's subnet. (For instance, if the root router's IP address is 192.168.0.1, assign the extended router an IP address within the range of 192.168.0.2 to 192.168.0.254. For example, 192.168.0.2.)
    2. Save the changes.


Note: After altering the router's IP address, log in again to the web management page.

  1. Identify the SSID for bridging:
    1. Visit Advanced > System Tools > System Parameters and focus on the 2.4GHz Wireless section. Enable WDS Bridging.
    2. Conduct a survey and select the root router's SSID. (For example, TP-Link_4F98.)
    3. If the root router has a wireless password, provide it.
    4. Save the settings.


  2. Deactivate DHCP: (Optional step. Try if it doesn't work)
    1. Access Network > DHCP Server.
    2. Uncheck Enable DHCP Server and save the changes.


Now, verify the WDS status by navigating to Advanced > Status > Wireless. A "Run" status indicates successful WDS bridging.


Now you are good to go!

Cheers 🙌


Displaying PHP Errors from admin-ajax.php in Wordpress

Edit wp-includes/class-wp-fatal-error-handler.php and 

change this in display_default_error_template( $error, $handled ) (Line: 193):


$message = sprintf(

                        '<p>%s</p><p><a href="%s">%s</a></p>',

                        $message,

                        /* translators: Documentation explaining debugging in WordPress. */

                        __( 'https://wordpress.org/support/article/debugging-in-wordpress/' ),

                        __( 'Learn more about debugging in WordPress.' )

                );

to


$message = sprintf(

                        '<p>%s</p><p><a href="%s">%s</a></p>',

                        $message . ' ' . json_encode($error),

                        /* translators: Documentation explaining debugging in WordPress. */

                        __( 'https://wordpress.org/support/article/debugging-in-wordpress/' ),

                        __( 'Learn more about debugging in WordPress.' )

                );


Then preview HTML response to admin-ajax.php using Dev Tools.

New Order alert on Telegram for Prestashop

I created a Prestashop Module for a project that would send an alert to a Telegarm group when ever a new order is placed.
I would like to share the same with all of you.
Please feel free to download and use 👦

You can download the module zip file from herehttps://github.com/bhaskarvyas001/TelegramOrderAlert

Requirement:
1. You will need to Telegram Bot Token
This can be got by creating a bot. Details to create a telegram bot is here - https://core.telegram.org/bots#6-botfather

2. You will need to know that Chat Id of the telegram group where you want to receive the alert
You can find out the Chat Id by following details here - https://stackoverflow.com/questions/32423837/telegram-bot-how-to-get-a-group-chat-id


Setting Screen


This is how the Telegram alert would look like


GROK Pattern in Streamsets Log Parser

Streamsets Log Parser allows you to parse and ingest Log Files from server
There are multiple pre-defined "Log Formats" to choose from such as CommonLog Format or Combined Log Format for Apache Access Logs
However, if you have defined your own log format then "GROK" patterns are great way to configure Log Parser to consume them.

The real challenge however is how should you define you GROK Pattern.
Test Grok Patterns (https://grokconstructor.appspot.com/do/matchis a great website to enter your GROK pattern and log line and test if things will work.

It also provides an "Automatic" mode (https://grokconstructor.appspot.com/do/automatic)
This will generate the GROK pattern for you based on the log line that you provide.

However, if you are using a customized version of Apache access log then you can use standard GROK patterns to match your log line.

For example, for my access log line GROK pattern is given below

Log Line
103.107.92.250 - - [21/Apr/2019:17:34:35 +0530] "GET /form/track-shipment/ HTTP/1.1" 200 8324 "http://onlinexpress.co.in/form/track-shipment/" "Mozilla/5.0 (Windows NT 6.1; Win64; x64) AppleWebKit/537.36 (KHTML, like Gecko) Chrome/73.0.3683.103 Safari/537.36" 400

Grok Pattern

%{IPORHOST:clientip} %{USER:ident} %{USER:auth} \[%{HTTPDATE:timestamp}\] "(?:%{WORD:verb} %{NOTSPACE:request}(?: HTTP/%{NUMBER:httpversion})?|%{DATA:rawrequest})" %{NUMBER:response} (?:%{NUMBER:bytes}|-) %{QS:referrer} %{QS:agent} %{NUMBER:responseTime}


Streamsets Log Parser Configuration


In the screenshot MYPATTERN is the custom name that I have given for my pattern in "GROK Pattern Definition" field.
The first word is always the pattern name, which is to be entered in the "GROK Pattern" field.

Setting up ELK and Streamsets in CWP (Cent OS 7)

Though getting started with ELK itself is pretty straight-forward and simple; I ran into small hurdles lately and I thought it would make sense to make a note of it and share with all of you.

Step 1 : Missing JAVA
So the very first thing you will find missing is the JDK 8 which is mandatory for all these tools.
Please do not install OpenJDK1.8 as it has missing packages and will land you in trouble later. We need to install Oracle JAVA 8
You can download the RPM from here  -
https://www.oracle.com/technetwork/java/javaee/downloads/jdk8-downloads-2133151.html

File downloaded: jdk-8u211-linux-x64.rpm

Make it executable : chmod +x jdk-8u211-linux-x64.rpm

Install: sudo yum install jdk-8u211-linux-x64.rpm

Set the JAVA_PATH: With Non Sudo user run these commands
vi .bash_profile
Add this line at end: export JAVA_HOME=/usr/java/jdk1.8.0_211-amd64/jre/bin


Step 2: Get Elastic Search
Please do not download the ZIP package. There is an RPM version available as well and it installs as a service. You can download it from here -
https://www.elastic.co/downloads/past-releases/elasticsearch-6-2-3

File downloaded: elasticsearch-6.2.3.rpm

Make it executable : chmod +x elasticsearch-6.2.3.rpm

Install: sudo yum install elasticsearch-6.2.3.rpm

Run: 
  sudo systemctl daemon-reload
  sudo systemctl enable elasticsearch.service
  systemctl start elasticsearch.service
  systemctl status  elasticsearch.service


Step 3: Get Kibana
Please do not download the ZIP package. There is an RPM version available as well and it installs as a service. You can download it from here -
https://www.elastic.co/downloads/past-releases/kibana-6-2-3

(NOTE: The version of Elastic Search and Kibana should be same)

File downloaded: kibana-6.2.3-x86_64.rpm

Make it executable : chmod +x kibana-6.2.3-x86_64.rpm

Install: sudo yum install kibana-6.2.3-x86_64.rpm

Run:
  sudo systemctl daemon-reload
  sudo systemctl enable kibana.service
  systemctl start kibana.service
  systemctl status  kibana.service


Step 4: Configure Kibana Host in config file
Location of Config file:  /etc/kibana/kibana.yml
Update these configurations -
server.host: "0.0.0.0"
elasticsearch.url: "http://localhost:9200"
elasticsearch.username: "admin"
elasticsearch.password: "password"


Step 5: Get Streamsets
You can download the zip from here:

wget https://archives.streamsets.com/datacollector/3.8.1/tarball/streamsets-datacollector-core-3.8.1.tgz

Untar the .tgz file: tar -zxf streamsets-datacollector-core-3.8.1.tgz
Increase Ulimit: 
vi /etc/security/limits.conf
Add these lines at end of file i.e.
*    soft    nofile 65000
*    hard    nofile 65000

Run:   nohup streamsets-datacollector-3.8.1/bin/streamsets dc &

Step 6: Enable Ports in Firewall
Following ports need to be opened i.e. 5601, 9200


Extend / resize SWAP partition in Centos

Hi,

If you are running low on swap memory in your centos environment; please follow these steps to extend the swap partition.

Step 1:
Since all the space in the physical disk would already be allocated to different partitions; there would not be any free space in your "Logical Volume" to give to swap partition.
You can see the volume group details by running the command > vgs


You can verify the logical volume details by running the command > lvs


You can see that there is no free space and my swap volume has 2GB space.


Step 2:
So, first logical step is to get some free space from other partition (probably from home partition as that has maximum space in the screenshot above) so that it can be allocated to swap partition

So, first we need to un-mount the home partition.
It can be done by following command > sudo umount -fl /home

Next to change the partition size, run the command >  lvreduce -L 173.88G /dev/mapper/centos-home

NOTE: Please note that the size to be given here is the new total size i.e. if old size was 60GB and you want to reduce it to 50GB so that you get 10GB free space then give 50GB here.


Once you have done this, you can run the vgs command again to verify the free space that has been obtained.


Step 3:
Now, we need to clear and turn off SWAP
This can be done by following commands i.e.
First run this command > echo "3" > /proc/sys/vm/drop_caches
Then run this command > swapoff -v /dev/centos/swap


Step 4:
Now, the grand step of increasing the swap partition
Please run this command > lvm lvresize /dev/centos/swap -L +6G

NOTE: Since I had freed 6GB space so I am adding 6GB to existing SWAP partition. This will make the new SWAP to be 2G + 6G = 8G


Running the vgs command again will show that the free space has been used up


Step 5:
Now we need to wipe off old SWAP signature and recreate the swap so that it know the new size
Use these command for it i.e.

First > mkswap /dev/centos/swap

Next >  swapon -va

Verify using command > swapon -s


Step 6:
Check the new partition details using command > lvs


Finally, Mount the home partition > sudo mount -fl /home


Notice: ob_end_clean(): failed to delete buffer.


Hello Coders,

So as the title reads; I am going to talk of below error that gave me a nightmare recently.

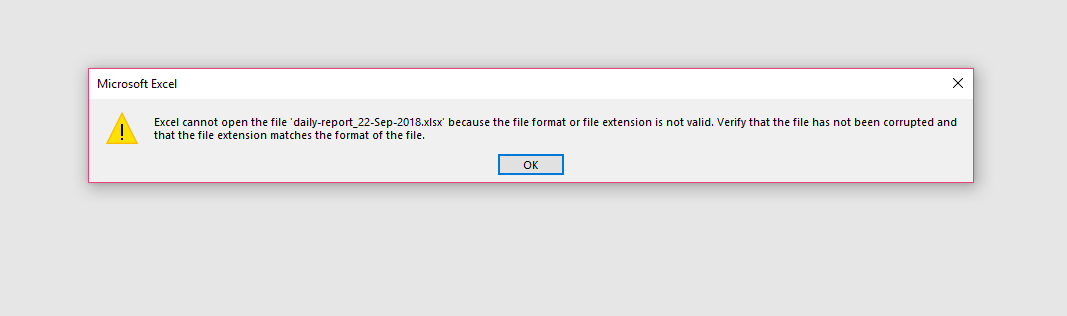
Notice: ob_end_clean(): failed to delete buffer

I use Spout Excel plugin (get it here) to write excel reports for my project.
One fine day the excel stopped working giving following error for each and every report 😢


I searched and searched and searched to understand the reason for this error. I thought I wrote something that was writing some corrupt data in the file.

However, then I found out that removing new lines after the closing PHP tag in one of my file fixed the issue. I am referring to the PHP closing tag i.e. ?>

It so appears that new line after the closing tag writes something in the output buffer even before my excel content was being written.

Such a silly issue caused catastrophic impact to the production system for one good day.

But all's well that ends well ..
- Happy coding -

Simplest PHP CRUD Generator

One of the most basic operation that one needs to do when creating a dynamic web application is to create DAO layer with CRUD methods for all the database tables. This is a trivial and repeatative work. Hence I thought why not write a program that generates this code automatically. Smart Eh.. :-)

So, friends today I would like to share the source code of the program with you.

https://github.com/bhaskarvyas001/php_crud_generator

Please feel free to download and test the program.
You are free to modify and use it however you wish. Cheers !!

How to print large modal popup?

Hello Readers,

Today we are going to see how to print large html modal popup. This is a situation that occurred to me in one of my assignments. The regular javascript command i.e.
window.print();
fails when printing a modal popup. The thing is that it fails to figure out the actual size of the content and shows only part of the content in the print preview.
I tried number of solutions which worked but then they had serious CSS issue while printing.
However, "PrintArea" jquery plugin (https://github.com/RitsC/PrintArea/) takes care of all these issues. It is also browser compatible and has bunch of options to customize what you wish to print.
It is very simple to use as well. All you have to write is
$( divIdToprint ).printArea( options );
 So, if you are struggling with issues related to printing large modal popup then go ahead and give this plugin a try :-)
 

Setting up ImageMagick (Imagick) in XAMPP PHP

Hello There,

I recently had a requirement to use PHP ImageMagick Plugin for one of my project.
So, I created this sample project that I am sharing here for you to use in case you need help.

About the project

https://bitbucket.org/bhaskarvyas001/imagick


This Project demonstrates how can you use the ImageMagick plugin in PHP to convert images / PDF from one format to another. More details about imageMagick here --> About ImageMagick

How do I get set up?

Follow these steps to properly install and enable ImageMagick in you environment.

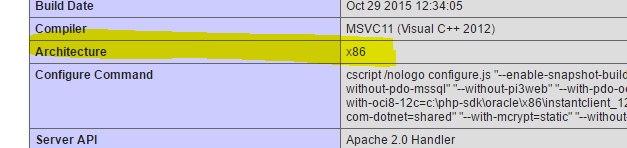
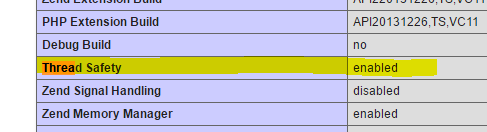
1. Open PHPInfo and check:
   Architecture = x86 or x64
   Thread Safety = yes or no


2. Download ImageMagick from:
   http://windows.php.net/downloads/pecl/deps/

   In my case I downloaded: ImageMagick-6.9.3-7-vc11-x86.zip
   because the Architecture under PHPInfo is x86
   as for vc11 or vc14
   search google for "visual c++ 11 runtime" or
   "visual c++ 14 runtime" and install it

3. Unzip and copy all dlls from the bin subfolder to the
Apache bin directory. It's a bunch of CORE_RL_*.dll
and IM_MOD_RL_*.dll plus a few other dlls.

In my case, I installed XAMPP in C:\XAMPP, so:
(from zip) bin/*.dll --> C:\XAMPP\apache\bin

4. Goto: http://pecl.php.net/package/imagick

    as of today, latest is 3.4.1 so I went to:
    http://pecl.php.net/package/imagick/3.4.1/windows

    My PHP version is: 5.6.18, and Thread Safety is Yes from Step #1, so I downloaded:
    5.6 Thread Safe (TS) x86
    I got: php_imagick-3.4.1-5.6-ts-vc11-x86.zip

5. Unzip and copy "php_imagick.dll" to the php extension folder:
    In my case:
    php_imagick.dll -> C:\XAMPP\php\ext

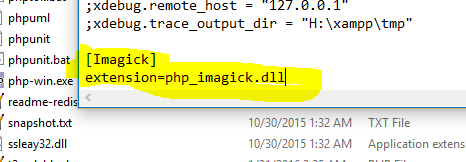
6. Edit "php.ini" and add at the very end
      [Imagick]
      extension=php_imagick.dll
   (Location of php.ini for me was C:\XAMPP\php\php.ini)


7. Restart Apache

8. Check PHPInfo
   scroll to section (or find): imagick  
   number of supported formats: 234


   If there is no "imagick" section or "supported format" is 0,
   something went wrong. Try all the steps carefully again

Text to Speech in Ionic / PhoneGap / Cordova Project

Hello Friends,

So recently I worked on this small project that is supposed to incorporate text to speech feature provided by Cordova Plugin in an Ionic project.

There are lot of plugins out there but after trying many of them; this is what worked for me.

Step 1) Install the following Cordova Plugin i.e.

cordova plugin add org.apache.cordova.plugin.tts

Step 2) Next write the following code snippet to make use of the plugin to speak the text

var textToSpeech = new SpeechSynthesisUtterance('hello There'); textToSpeech.lang = 'en-US';
textToSpeech.rate = '0.7'; speechSynthesis.speak(textToSpeech);

Write the above code snippet in the onClick function of the speak button of your application.
That's it. Enjoy the way how your application now communicates with you :-)


Thanks to the following discussion at Ionic Forum i.e.

https://forum.ionicframework.com/t/problems-with-text-to-speech/31927


Text to Speech in Ionic / PhoneGap / Cordova Project

Hello Friends,

So recently I worked on this small project that is supposed to incorporate text to speech feature provided by Cordova Plugin in an Ionic project.

There are lot of plugins out there but after trying many of them; this is what worked for me.

Step 1) Install the following Cordova Plugin i.e.

cordova plugin add org.apache.cordova.plugin.tts

Step 2) Next write the following code snippet to make use of the plugin to speak the text

var textToSpeech = new SpeechSynthesisUtterance('hello There'); textToSpeech.lang = 'en-US';
textToSpeech.rate = '0.7'; speechSynthesis.speak(textToSpeech);

Write the above code snippet in the onClick function of the speak button of your application.
That's it. Enjoy the way how your application now communicates with you :-)


Thanks to the following discussion at Ionic Forum i.e.

https://forum.ionicframework.com/t/problems-with-text-to-speech/31927


Prestashop 1.6 | Product import through CSV tips

Recently I have been uploading lots of products to the website http://www.assamesebooks.com
The upload was done through uploading a CSV file with all the product details.
The "Sample" CSV file to upload products is provide by Prestashop.

  1. To begin with navigate to the upload product CSV screen from the menu
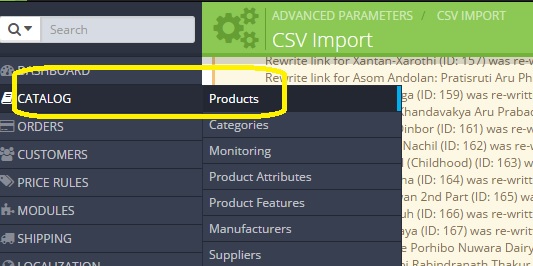
Catalog -> Products - > click on the small import icon above the search button to navigate to the import CSV screen

Products Menu under Catalog

The import icon as highlighted

The CSV import Page

2. There are few import import settings on this page i.e.
  • Field Separator - This is the separator by how the individual columns in you CSV are separated. By default it is semicolon (;) so please be mindful of changing it if your file is a comma separated one
  • Multiple Value Separator - There are times when you have multiple values for a column. For example multiple Meta-keywords.  In that case you need to use the separator you mention here in the file.
  • Delete All products before import - I think this is self explanatory and a dangerous option. Use wisely as the products get deleted before the import starts. Which means even if there is a failure during the import; the products are already deleted.
  • Force all ID numbers - Use this option in case you want the ID in your CSV file to be used instead of auto generated by the database.
3. The sample CSV file can also be downloaded from this page. You can find it in the lower right corner side of the page. 


4. On the next page you need to MAP the columns in the CSV file to the expected values by Prestashop for product upload. This step is super important. 
Please select the data from the drop down which is represented by the CSV column.
Another important setting here is "Lines to skip". Use this option to skip the header row from your CSV file. If your CSV has no header then give this as 0 to read and process all the rows in the CSV.

You can also save your mapping by giving some name and clicking the save button. This way; next time when you plan to upload the CSV you don't have to do all the mappings.

5. Finally you are ready to start the import process. Click on the IMPORT button the the bottom of
the page.

6. Before we wrap up, I would share some tips of the way data is captured in the CSV file. Most of the columns in the CSV is self explanatory but some need special guidance. Below screen shot has those important column from my CSV file.


  • Tags - A tag is used to group related products with same search term. For EX: if we search for History then books under all categories related to History should come up who are tagged with the term History. It is a multi value column. You can give multiple values separated using the separator.
  • URL rewritten - This is supposed to be used to make SEO friendly URLs but some how populating this value in the CSV gives weird errors. So, I prefer keeping this column empty. In that case Prestashop auto generates the URL rewritten value based on the product name which as per me is a desired solution.
  • Image URLs -  This is again a multi valued column cause a product can have many images and you can give the URL of all those images separated by the separator. The funny thing is how do we get the URL of the images of a product that you are trying to upload.
    What I did is that I created a folder in the root of my server i.e. at public_html named a productImages and uploaded all the images here. Hence, the URL for the images became as "http://assamesebooks.com/productImages/AD00636.jpg". I used this URL in the CSV.
  • Feature(Name:Value:Position) - This is the most complex to understand column and the MOST important one too. This is important cause it helps us upload custom attributes of the product. For example products on http://assamesebooks.com had attributes like pages numbers, Author, Translator, year of publication etc.
    First of all we need to register our custom attributes in Prestashop. This can be done by following menu item i.e.

    Catalog - > ProductFeatures
    Post which you can mention all of these attributes / features along with their values in the same column separated by multi value separator. For example :

    Sub Title:War Book;Author:Anu Barua;Publisher:Purbanchal Prakash;Publication Year:2015;ISBN:978-81-7213-254-5;Language:Assamese;Pages:164;Weight (gms):286


    It took me nice 1 hour to figure out how to do this :-)

Hope these tips help some one save valuable time.. :-P